Adding Custom Panels to the Contact Information Panel
Add custom panels to your relationship map information panels featuring previews of Visualforce pages or external websites that can be clicked for full access.
Note: This functionality does not support the display of standard Salesforce pages.
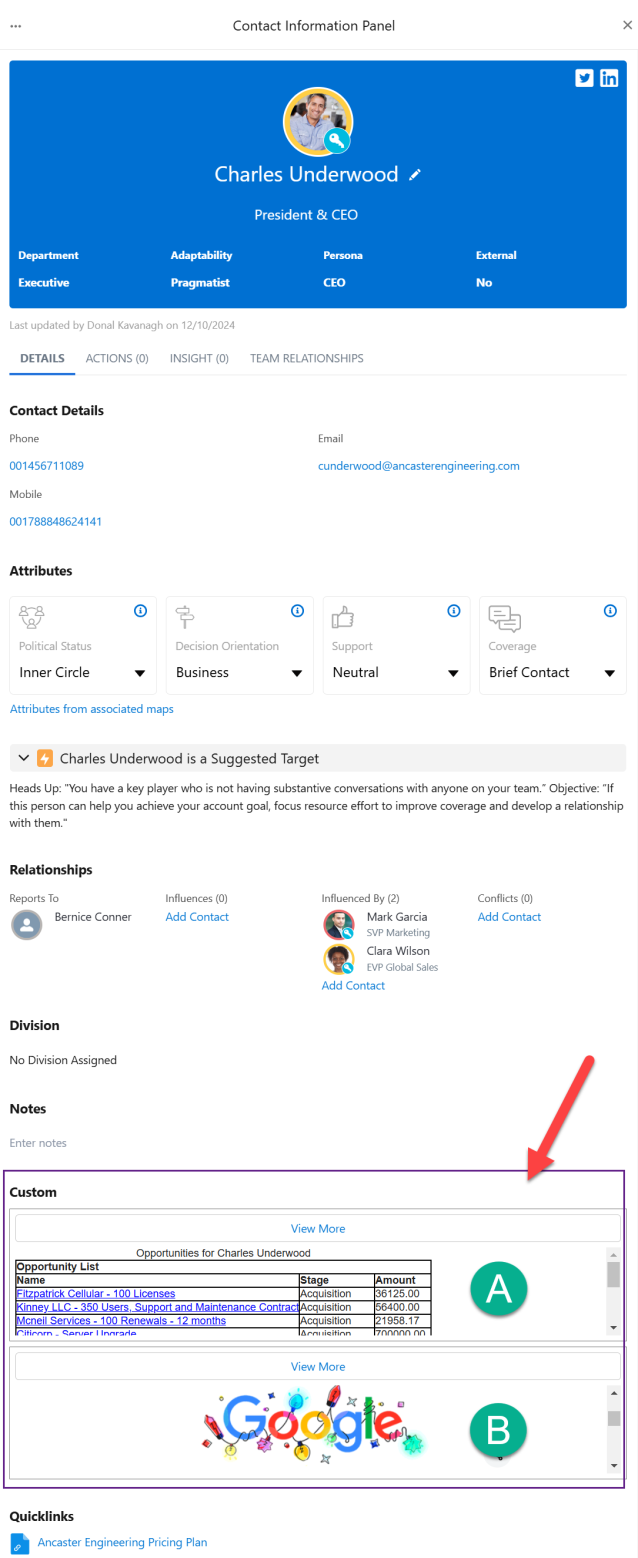
In the example shown below (contact is 'Charles Underwood'), we can see examples of a Visualforce page that displays opportunities associated with the contact (see A indicated below) and a link to an external site (see B). Up to five custom panels can be added to contact information panels.
The above examples of custom panels can be recreated with the following steps:
-
Create the controller Apex class [required for the Visualforce panel]
-
Create the Visualforce page [required for the Visualforce panel]
-
Update the custom settings [required for the Visualforce panel and linking to an external website]
Create the controller Apex class
-
In Setup, go to Apex Classes.
-
Click New.
-
In the Apex Class Edit window, enter the necessary code. See the sample code below for an example
Copypublic class ContactPanelOppController {
public Id contactId {get;set;}
public ContactInfo contactInfo {get; set;}
public List<OppInfo> opps {get; set;}
public ContactPanelOppController(){
contactId = apexpages.currentpage().getparameters().get('id');
}
public ContactInfo getContactDetails(){
List<Contact> contactDetails = [SELECT Id, Name, Email, Phone,
(SELECT Id, OpportunityId, Opportunity.Name, Opportunity.StageName, Opportunity.Amount, ContactId FROM OpportunityContactRoles)
FROM Contact
Where Id= :contactId
];
ContactInfo contactInfo = null; //new ContactInfo
opps = new List<OppInfo>();
for(Contact c: contactDetails){
for(OpportunityContactRole role: c.OpportunityContactRoles){
opps.add(new OppInfo(role.Opportunity.Name, role.Opportunity.StageName, role.Opportunity.Amount, role.Opportunity.Id));
}
contactInfo = new ContactInfo(c.Name, c.Email, c.Phone, opps);
}
return contactInfo;
}
public Class ContactInfo{
public String name {get; set;}
public String email {get; set;}
public String phone {get; set;}
public List<OppInfo> opps {get; set;}
public ContactInfo(String name, String email, String phone, List<OppInfo> opps){
this.name = name;
this.email = email;
this.phone = phone;
this.opps = opps;
}
}
public Class OppInfo{
public String id {get; set;}
public String name {get; set;}
public String stage {get; set;}
public Decimal amount {get; set;}
public OppInfo(String name, String stage, Decimal amount, String id){
this.name = name;
this.stage = stage;
this.amount = amount;
this.id = id;
}
}
}
-
Click Save.
Once the controller class is created, you can create the Visualforce custom page.
Create the Visualforce page
Create a Visualforce page that references the above controller class.
-
In Setup, go to Visualforce Pages.
-
Click New.
-
On the Visualforce Page screen, enter the following information:
-
Label: the label that will be displayed on the custom page.
We'll call our Visualforce page 'Custom Panel Opportunities'.
-
Name: the name by which the Visualforce page will be identified in the custom settings (see next section below). In this example, we are using 'Custom_Panel_Opportunities'.
-
-
Enter the markup for this page. This references the controller class. The code below references the Apex class above.
Copy<apex:page controller="ContactPanelOppController" showHeader="false" sidebar="false">
<style>
.tableClass {
border: 1px solid black;
}
.tableClass tr, .tableClass th, .tableClass td {
border: 1px solid black;
}
a {
color: blue;
}
</style>
<div>
</div>
<apex:dataTable value="{!contactDetails.opps}" var="opp" id="contactOppTable" rowClasses="odd,even" styleClass="tableClass">
<apex:facet name="caption">Opportunities for {!contactDetails.name}</apex:facet>
<apex:facet name="header">Opportunity List</apex:facet>
<apex:column >
<apex:facet name="header">Name</apex:facet>
<apex:outputLink value="/{!opp.Id}" target="_blank">{!opp.Name}</apex:outputLink>
</apex:column>
<apex:column >
<apex:facet name="header">Stage</apex:facet>
<apex:outputText value="{!opp.stage}"></apex:outputText>
</apex:column>
<apex:column >
<apex:facet name="header">Amount</apex:facet>
<apex:outputText value="{!opp.amount}"></apex:outputText>
</apex:column>
</apex:dataTable>
</apex:page> -
Click Save.
Update the custom settings
In the Altify Relationship Settings you can create up to five custom panels to appear in the information panels of your relationship map contacts.
First, you have to enable a Custom section on the Details tab - this section will house the custom panels. Then, for each custom panel, you need to define the relevant link (setting 'Custom Panel #') and the height (setting 'Custom Panel # Height').
Note: If you don't assign a height, the custom panel will not appear.
To apply the custom panels as shown in our example, do the following:
-
In Setup, go to Custom Settings.
-
Click Manage beside Altify Relationships Settings.
-
Click Edit on the Altify Relationships Settings page.
-
To add the Custom section that will accommodate the custom panels, enter the value 'Custom' in the values listed for the setting Contact Details Side Panel Named Order - as highlighted in our example below:
Contact Details,Attributes,Target,Relationships,Division,Notes,Custom,Quicklinks,Owner,Other
The order you assign to these sections is the order in which they appear in the Contact Information Panel. For more information, see Hiding or Reordering Sections on the Contact Information Panel.
-
Enter the target link and corresponding height (in pixels) for each custom panel you are creating. For our example, these are entered as follows:
-
Custom Panel 1: '/apex/c__Custom_Panel_Opportunities?id=${contactId}'
-
Custom Panel 1 Height: '100'
-
Custom Panel 2: 'https://google.com/search?igu=1'
-
Custom Panel 2 Height: '100'
-
-
Click Save.